Its the little things….

IMG_1962

Ahhh, the little things in knitting that make the most difference and save the most time in the end….

I’m going to share a secret. It’s not sexy (sorry!) but it’s a vital piece of knitting know-how. There’s a reason the saying “a stitch in time, saves nine” rings true over and over again.

Let me go back a little. I learned to knit from my mum when I was about four. I’m one of those unique left-handed people *winks* and although my mum tried to show me in slow-mo how to embroider I just couldn’t get it. I was trying to embroider backwards using my left hand (going from right to left) a skill, I grant you, but not one that led to any valuable embroidery happening! Thankfully my first teacher at school was left handed too…and I picked this skill up pretty soon after being shown how to embroider using my left hand.

So, the embroidery thing wasn’t working for me prior to starting primary school.

*Enter knitting needles, stage left*

Bravo! A skill I could manage with both hands, including my left one (keggy as we call it in the UK!!) I quickly learned to cast on, knit, and purl quickly on my junior knitting needles; and I loved it!

What i didn’t learn from my mum or grandma were the more creative techniques to knitting. These I learned from my textile tutors at art college. Some of this was boring stuff to a sixteen year old – always knit a tension square, always pin, measure and block finished pieces before sewing up. BUT, these are really important techniques that can save time and headache much further down the line.

For example, knitting to vintage patterns, especially original patterns means I’m unable to work with the yarn specified in the pattern. So this requires some creative thinking on how best to find a suitable alternative yarn. A tension square is always a must of this purpose. It helps ensure I have the right needle and yarn for the pattern I need. A lot of old patterns use a measurement such as 9 stitches to 1 inch. If I’m actually knitting less stitches (say, 8 stitches to 1 inch) and the garment is 18 inches across the front; then I’m 18 stitches short (1 stitch short per inch)….and that equates to a full two inches less, so my garment will be 16 inches across the front…how tight do you want your sweater darling??!

Knitting a tension square ensures I go up (or down) a needle size depending on what my natural tension with that yarn is. And my tension changes. This can be due to the feel of the yarn, the type of needles I’m using such as circular or straight, and the material of the needles such as metal or wood. There’s so many variables….it just makes sense to do the groundwork at the beginning and save the hassle later.

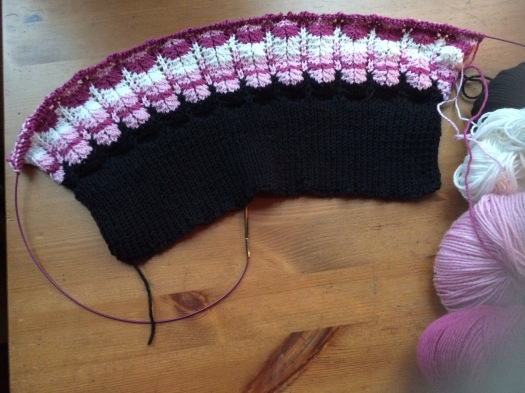
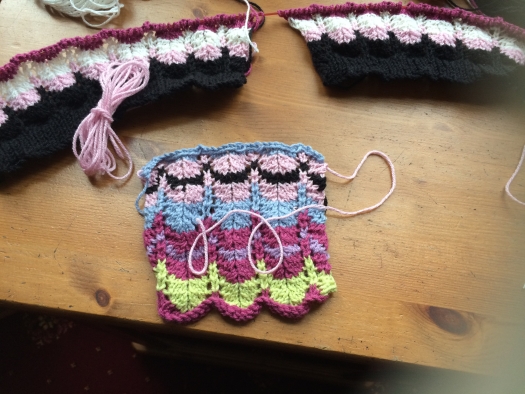
Additionally, a tension square means I have yarn in a stash. As in my last blog post, I’m currently finishing off the Victory Jumper. I was knitting up the sleeves when I ran out of the shell pink colour. Thankfully, I had used the pink to check my tension at the beginning of the project and had just enough to finish the two rows for the pattern on both sleeves! 

So a stitch in time, really does save nine. Like I said at the start, it’s not sexy, but getting it right first time is!


Winning Victoriously!

IMG_1879

Being a knitting addict brings some comical signs and symptoms that only other addicts can identify with….

I have lots of knitting patterns. Lots….and lots….and lots….Some of these are online in my Ravelry library, but the majority live at home in glorious hard copy….next to the bed, next to the sofa, behind the sofa, in one of my numerous knitting bags that holds odd patterns. The list of places is endless. What goes with the patterns though takes up far more room.

Yarn. Lots of yarn. 

It’s impossible for me to walk past a yarn shop without going in and looking what’s available. When I go on holiday I seek out all the local wool shops and visit them individually. On different days. So I can really browse. This usually results in me coming home with a new load of yarn which I usually have a pattern in mind for (I use the term usually very loosely here!…)

Like all knitters and crocheters the world over I have a large stash of yarn. I have enough to keep me busy for the next two years plus. So I’ve decide to begin a project using some stashed yarn (so I can make more room for future purchases, of course!)

Along with my 50s summer lacey cotton jumper, I’m using a cotton/wool blend Rowan yarn which has recently been discontinued. This means I got it cheap (yay!!) at a half price bargain…and it would be wrong to not buy it when it’s cheap! So I’m currently playing yarn chicken with what I have left of four colours. So far I have completed the front and back, with enough for the sleeves, possibly with the stripes, if not, then in plain black.

The pattern is a 1940s Your Victory Jumper pattern, available to download for free (yay!) here free download pattern The original uses three colours, however, as I have less yarn, but more colours, I decided to add a fourth colour way into the pattern, which is leading to an interesting pattern repeat.

IMG_1960        IMG_1961

I’m expecting to finish this project in the next two weeks. That will include blocking it, sewing the ends in and making it up. Although it’s a little too warm for this sweater now, it will be handy to pull on once the weather begins to cool in October, so I’ll get plenty of wear out of it before the year is out.

If you have identified with the stash story above, then you too are a knitting addict. Long may there be no cure, except another woolly sweater!! 🙂


1950s summer cotton lacey top

I decided it was high time to begin this lovely project which I’ve been hanging my nose over for the past year – a 1950s pattern for a cotton summer lacey top with velvet ribbon detail on the yoke.

I found some beautiful 4ply cotton at my favourite yarn store – a Wendy Luxury 100% cotton that knits up beautifully and really sets off the lace pattern. I had considered using a blended cotton/wool yarn, but I thought the wool would soften the lace pattern; and I wanted the crispness of cotton to pick out each stitch.

It’s an suprisingly easy 12 row pattern to follow and looks pretty impressive with minimum effort. Getting my tension right with the cotton was important so I didn’t lose any of the beautiful detailing on the body of the garment. 

As with most vintage tops, the ribbing on the waist of this top is extra deep to give that great 50s feminine silhouette that we all love so much! The top begins on the waist and has a soft blouson look over the lace patterning, then sits tightly around the yoke. 

I’ll be creating another blog soon about the classic shapes and silhouettes of ladies garments from 20s through to the 50s, and how these shapes were set into the psyche through starlets and icons such as Marilyn, Rita and Audrey.


Hey! Hello there!

I’m a vintage vixen with a love of all things timeless – cardigans, sweaters, shawls, boleros, gloves, hats….the list goes on and on!

I make hand knitted garments using original patterns from 1930s through to the 1950s, as well as creating my own patterns to give a reproduction of those classic, vintage looks.

I am a self-confessed yarn snob and only use natural fibres in all my work. Hell! it can take a while to create or follow a hand knitted pattern from the first cast on stitch to the last press of the final garment; and it seems only right to use a yarn that brings the real beauty of the piece to life. So whether that’s the warmest wool from the fleece of Shetland Isle sheep, the haze of mohair, the  softest alpaca fleece or the purest silk; each garment stands out as a piece of unique beauty. Sometimes I mix fibres, such as mohair and merino wool to create a soft halo on a sturdier garment, but I think the final results speak for themselves.

So welcome, feel free to browse and see my past and current projects!

I have plenty of original and own designed patterns for one off, unique pieces using the softest, thinnest fibres for that truely vintage look!